Introduction
This posting demonstrates how to create the elements needed to programmatically access the RESTful API associated with Windows Azure Active Directory Graph. The following definitions are useful in understanding what is required to develop such applications:- Tenant: owns or manages an instance of a cloud service
- Windows Azure Tenant: each Microsoft cloud service is associated with its own instance of Windows Azure Active Directory (Windows Azure AD). This AD instance is associated with an organization's cloud service and serves said service's tenant.
- Service Principal: this is an instance of an application within the AD tenant. Policies including permissions are applied to a service principal. For example:
- An Address Book application's service principal might have read-only access to the AD instance associated with a Windows cloud service.
- An HR application's service principal might have read-write access to the AD instance associated with a Windows cloud service.
There are a large number of excellent examples (Windows Azure AD Graph Code Samples Index) demonstrating the development of applications that use "Windows Azure Active Directory Graph." Each of these samples access AD Graph and therefore must make use of a service principal. The samples each utilize an app.config or web.config file containing elements corresponding to what is required to access a service principal. An example from "Sample App for Windows Azure AD Graph Differential Query" taken from an app.config is as follows:
<add key="TenantDomainName" value="BoostWIP365.onmicrosoft.com"/>
<add key="AppPrincipalId" value="9221e5fc-f3df-4337-8403-928abeb7af4e"/>
<add key="Password" value="G7Jo9Mis0DSyFXVdbEaA" />
Setting up an Azure Service Principal
These steps should be performed on a development machine (the machine on which you have Visual Studio 2013 installed or on which PowerShell scripts are developed). To create the tenant information perform the following steps:
1. Install Microsoft Online Services Sign-In Assistant version 7.0 or greater (there is a separate version for Windows 7/Windows 2008R2 and a newer version for Windows 8/8.1):
If you are running Windows 7 or Windows 2008/2008 R2 install the version of Microsoft Online Services Sign-In Assistant found at: Microsoft Online Services Sign-In Assistant for IT Professionals RTW
Note the system requirements (a.k.a. do not install on Windows 8 or Windows 8.1):
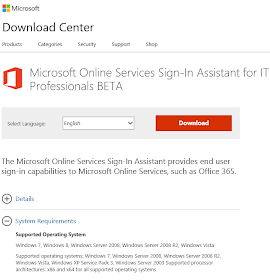
If you are running Windows 8 or Windows 8.1 install the version of Microsoft Online Services Sign-In Assistant found at:Microsoft Online Services Sign-In Assistant for IT Professionals BETA
Note the system requirements below:
2. "Install the Windows Azure AD Module" based on your operating system (32-bit or 64-bit):
3. When prompted (see below) run the downloaded application:
3.1 It is useful to allow the installer to place a shortcut to the Windows Azure AD module for Windows PowerShell on the desktop.
4. Download the sample application "Sample App for Windows Azure AD Graph Differential Query".
5. Unzip the sample in order to gain access to CreateServicePrincipal.ps1. This PowerShell script lives up to its name sake; the script creates a service principal.
6. Run the Windows Azure AD module for Windows PowerShell by clicking on the shortcut previously installed on the desktop:
7. The CreateServicePrincipal.ps1 PowshellScript should be run within the console, Windows Azure AD module for Windows PowerShell:
Note: if an error is encountered "CreateServicePrincipal.ps1 cannot be loaded because the execution of scripts is disabled on this system" please see "Running Windows PowerShell Scripts"
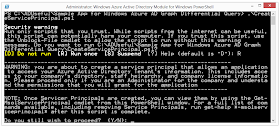
8. Hit return to run the script. The CreateServicePrincipal.ps1 script when run is prone to prompt prolifically. After CreateServicePrincipal.ps1 is run, the user is prompted as follows:
9. Enter R and hit return to run the script:
10. When prompted enter Y and hit return to continue execution:
11. The previous screen show the user being prompted to "Enter a Service Principal Name" to which the name "Order Muffins" was entered. When return is hit the following is displayed:
12. To continue the user presses any key (unless they are worn out by excessive prompting) followed by entering their credentials:
- username: this is in the form of <username>@<domain>.onmicrosoft.com
- password: the password associated with the domain account
13. After the user successfully enters their credentials they are prompted again (as follows):
14. Pressing any key continues the prompts deluge. The user is ask whether they want their service principal to have read-only or read-write permissions as an AD tenant:
15. After entering R (read-only) or W (read-write) the script will run for several seconds creating the service principal:
16. The previous screen shot obviously removes the application principal ID and the application principal password. The principal ID is in the form of a GUID (e,g, d266d7cc-13c7-4e89-aaac-8c699cf6aff2) and the password is in the form of a case-sensitive text string (e,g, 8K+0OX6pvUZtaGo4YdUogT9xiF15aqyx1HbSvEg8Sec=).
With an application principal ID and the application principal password, a user can now write their own application that exercises Windows Azure's graph API or they can run any of the samples provided by Microsoft.
1. Install Microsoft Online Services Sign-In Assistant version 7.0 or greater (there is a separate version for Windows 7/Windows 2008R2 and a newer version for Windows 8/8.1):
If you are running Windows 7 or Windows 2008/2008 R2 install the version of Microsoft Online Services Sign-In Assistant found at: Microsoft Online Services Sign-In Assistant for IT Professionals RTW
Note the system requirements (a.k.a. do not install on Windows 8 or Windows 8.1):
Note the system requirements below:
3. When prompted (see below) run the downloaded application:
3.1 It is useful to allow the installer to place a shortcut to the Windows Azure AD module for Windows PowerShell on the desktop.
4. Download the sample application "Sample App for Windows Azure AD Graph Differential Query".
5. Unzip the sample in order to gain access to CreateServicePrincipal.ps1. This PowerShell script lives up to its name sake; the script creates a service principal.
6. Run the Windows Azure AD module for Windows PowerShell by clicking on the shortcut previously installed on the desktop:
7. The CreateServicePrincipal.ps1 PowshellScript should be run within the console, Windows Azure AD module for Windows PowerShell:
Note: if an error is encountered "CreateServicePrincipal.ps1 cannot be loaded because the execution of scripts is disabled on this system" please see "Running Windows PowerShell Scripts"
8. Hit return to run the script. The CreateServicePrincipal.ps1 script when run is prone to prompt prolifically. After CreateServicePrincipal.ps1 is run, the user is prompted as follows:
9. Enter R and hit return to run the script:
10. When prompted enter Y and hit return to continue execution:
11. The previous screen show the user being prompted to "Enter a Service Principal Name" to which the name "Order Muffins" was entered. When return is hit the following is displayed:
12. To continue the user presses any key (unless they are worn out by excessive prompting) followed by entering their credentials:
- username: this is in the form of <username>@<domain>.onmicrosoft.com
- password: the password associated with the domain account
13. After the user successfully enters their credentials they are prompted again (as follows):
14. Pressing any key continues the prompts deluge. The user is ask whether they want their service principal to have read-only or read-write permissions as an AD tenant:
15. After entering R (read-only) or W (read-write) the script will run for several seconds creating the service principal:
16. The previous screen shot obviously removes the application principal ID and the application principal password. The principal ID is in the form of a GUID (e,g, d266d7cc-13c7-4e89-aaac-8c699cf6aff2) and the password is in the form of a case-sensitive text string (e,g, 8K+0OX6pvUZtaGo4YdUogT9xiF15aqyx1HbSvEg8Sec=).
Running Sample App for Windows Azure AD Graph Differential Query
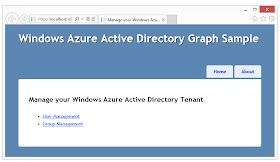
When the sample application, Sample App for Windows Azure AD Graph Differential Query, is run it displays the following:
Clicking on the User Management link causes the application to invoke the Windows Azure AD Graph 'API using the sample's domain, principal ID and principal password. The results are as follows:
Change the domain, principal ID and principal password to the values created previously results in the following being displayed:
Obviously the AD repository of a newly created AD tenant contains fewer values than a Microsoft sample AD tenant but the code did behave correctly.
Appendix A: Creating a Windows Azure AD Tenant
This section is only for developers that need to create a Windows Azure Active Directory Tenant. All Windows cloud services are associated with an AD tenant. To create such a trial AD tenant a developer could sign up for free trial of Azure at "Try it out. For free" or sign up for a free trial of cloud-based Office 365 at www,Office365.com The approach taken here is to sign up directly for an AD Tenant at: https://account.windowsazure.com/organization.
The previous URL displays the following in Internet Explorer:
The domain being registered below is shown to be friendlybakery@onmicrosoft.com:
When the "check availability" green button has been pressed the web page prompts a user to provide their login and country information:
The "continue" green button on the previous screen is not enabled until the phone number associated with the account is validated. To begin the validation process select "send text message" which will send a text message containing a validation code to the phone number. The page will update as shown below to include a text box in which the verification code can be entered and a "verify code" button.
When the code is entered (as shown below) click on the "verify code" button:
Once the code has been verified click on green button labeled "continue".


No comments:
Post a Comment