Introduction
Visual Studio Online is a fairly young cloud-based application (released in 2013). With regards to tracking tasks and bugs it does support a variety of configurable reports. Excel by contrast is a more mature reporting generating and data formatting environment (release in 1987). So to take advantage of the Excel, an extremely mature product, Visual Studio Online supports Excel integration. Excel can be used to view tasks/bugs and can even handle the modification of tasks and the creation of new tasks. Excel can also handle bulk import so if you move from Jira (for example) export the bugs to CSV format and then import into Visual Studio Online using Excel.
Excel 2007 and later versions can interface with Team Foundation Service (TFS) and since Visual Studio Online is a cloud-hosted variant of TFS, your minimum Excel version is 2007.
When Excel connects to Visual Studio Online or TFS it uses queries in order to access work items. The general workflow for the interaction between Visual Studio Online and Excel is as follows:
1) Create a Query within the Visual Studio Online instance (web site) or using Team Explorer or using Visual Studio
2) Connect to Visual Studio Online (or TFS) via Excel
3) Retrieve the query results using Excel
3) Retrieve the query results using Excel
4) Add/Modify/Delete work items using Excel
5) Publish changes from Excel to Visual Studio Online (or TFS)
The following shows the steps required in integrating Excel with Visual Studio Online:
The previous diagram is taken MSDN's walk through of how to integrate Excel and Visual Studio Online (Work in Microsoft Excel and Microsoft Project connected to Team Foundation Server). Microsoft's write up is good but it is not as detailed as this posting. Even a person who does not use Visual Studio Online daily (a manager, a product manager, ad hoc QA, et al.) will find every step required to access Visual Studio Online from Excel by following what is documented here.
Signing up for a Visual Studio Online instance was covered by a previous post: Signing up for Visual Studio Online (cloud-based Team Foundation Server).
Prerequisite: Create an Query in Visual Studio Online
As stated previously Excel accesses Visual Studio Online work items through Visual Studio Online queries. Queries are associated with a Visual Studio Online project instance. To view all the queries associated with a Visual Studio Online project perform the following steps:
1) In Internet Explorer navigate to the instance of Visual Studio Online using the instance's URL (the instance in this case is https://AdmiralGraceHopper.visualstudio.com/):
1) In Internet Explorer navigate to the instance of Visual Studio Online using the instance's URL (the instance in this case is https://AdmiralGraceHopper.visualstudio.com/):
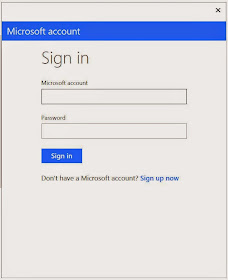
2) If the credentials for the appropriate Microsoft account associated with the Visual Studio Online instance have not been entered, a user will be prompted to enter them:
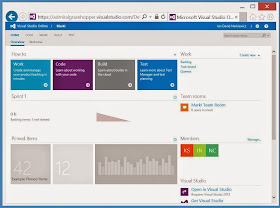
3) Once the Microsoft Account credentials have been entered for the Visual Studio Online instance, the browser will be redirected to the main screen for the instance:
4) Under "Recent projects & teams" a list of projects is displayed. For this example the project MarkI is selected. If the desired project is not visible under the most recent list, click on the Browse button to select the appropriate Visual Studio Online project:
6) The MarkI project is shown above. To view the queries associated with the instance click on the WORK menu (not the Work "How to" help entry):
7) When the WORK menu item is selected the Backlogs and Queries tabs are visible. By default Queries are visible as follows:
The previous screenshot shows the default queries of the Mark1 project. These are the queries will ultimately be visible to an Excel workbook when accessing the Visual Studio Online instance https://AdmiralGraceHopper.visualstudio.com and the Mark1 project.
Additional queries can be created for use in Visual Studio Online or to be accessed via Excel by clicking on the New dropdown and selecting New query:
For this example (using Excel to access Visual Studio Online) the default queries for the MarkI project will be used.
Connecting Excel to Visual Studio Online
The following steps are required to support Visual Studio Online's integration with Excel:1) Install Team Explorer (see the previous post Visual Studio Online (cloud-hosted TFS) for non-Visual Studio Developers). If Visual Studio is installed this step can be skipped as Visual Studio includes the TFS Excel add-in.
2) Launch Excel 2007 or any later version and create a new "Blank worksheet" which appears as follows in Excel 2013:
3) Select the TEAM ribbon which is as follows:
4) If the Team ribbon is not visible, see the section at the end of this posted "Re-enabling the TEAM Ribbon"
5) To connect to Visual Studio Online or TFS click on the TEAM | New List button which causes the Connect to Team Foundation Server dialog to be displayed:
6) From the Connect to Team Foundation Server dialog click on the Servers button thus displaying the Add/Remove Team Foundation Server dialog:
7) From the Add/Remove Team Foundation Server dialog click on the Add button thus displaying the Add Team Foundation Server dialog:
8) Under the textbox labeled, "Name or URL of Team Foundation Server:" enter the URL associated with the desired Visual Studio Online instance (for this example the Visual Studio Online URL is https://AdmiralGraceHopper.visualstudio.com/):
9) Once the Visual Studio Online instance URL is specified, click on OK thus displaying a "Sign in" dialog to sign into said Visual Studio Online instance where the appropriate Microsoft account ID and password can be entered:
10) Enter the Microsoft account name and password:
11) Click on the Sign In button:
12) When a valid Sign In credentials are entered then the Add/Remove Team Foundation Server is displayed again with the freshly entered Visual Studio Online URL highlighted. Simply click on Close:
13) From the Connect to Team Foundation Server dialog, select the appropriate Team Project (e.g. MarkI) and click on Connect.
At this stage Excel is connected to a Visual Studio Online project but has yet to retrieve work items using a Visual Studio Online query.
Select a Query to Import into Excel
Clicking on the ... button next to Query List drop down reveals the Select Query dialog:
Expanding the folders in the Select Query dialog reveals all the queries from the MarkI project:
Select the Product Backlog query and click the Select Query dialog's OK button. With the Select Query dialog closed the New List dialog is active again:
Clicking on the OK button of the New List dialog will cause Sheet 1 of the workbook to retrieve the work items associated with the Mark1/Shared Queries/Product Backlog query:
Re-enabling the TEAM Ribbon
1) In Excel click on the File menu (it is not a ribbon as no ribbon is displayed when File is clicked on):2) Click on Options thus displaying the Excel Options dialog:
3) From the categories along the left side of the dialog, select Add-Ins:
4) Notice under "Active Application Add-Ins" that there is no add-in named "Team Foundation Add-in". To enable the Team Foundation Add-in select "Com Add-Ins" from the Manage drop down and click on Go:
5) This displays the COM Add-Ins dialog:
6) Click on the checkbox next to the Team Foundation Add-in entry and click on OK:
7) Clicking on OK returns to the workbook view of Excel where the TEAM menu entry should be visible (see above). This means the TEAM capabilities are enabled since Team Foundation Add-In is enabled.
Subsequently selecting File | Options | Add-In displays the Excel Options | Add-Ins where the Team Foundation Add-In is listed under Active Application Add-ins:


No comments:
Post a Comment