Tuesday, December 31, 2019

AWS/DevOps: Generate a key pair with AWS Console for an EC2 Instance

Creating a key pair to assign to an AWS EC2 instance using AWS's Console is trivial. Why discuss such a task? I have a problem. I inherited an EC2 instance and the existing key is with a guy on vacation and offline. I am concerned that DevOps infrastructure exists the uses the key to access the existing EC2 instance so swapping keys is not an option. The solution is to clone the EC2 instance and assign the clone a known key pair, hence the need to create a new key.

Do not lose the key pair they can only be downloaded once. Do not entrust the key pair to a guy going skiing in a remote mountain resort with no cell phone connectivity. 

Generating a key pair with AWS Console for an EC2 instance is performed as follows:


1. Login to the AWS Console:
https://console.aws.amazon.com/

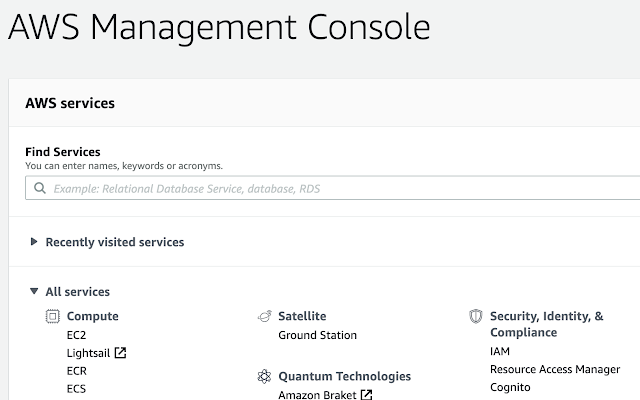
2. From the console, select EC2 (make sure the region is set correctly which for my project is US East (N. Virginia) us-east-1 to display the EC2 dashboard. You could search for EC2 but AWS puts EC2 top left under All services | Compute:

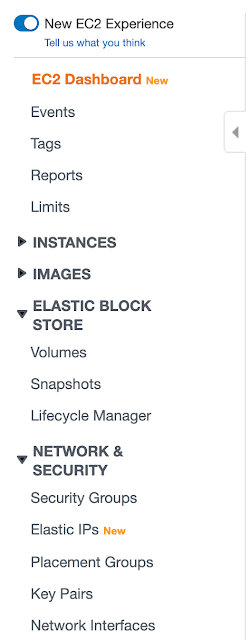
3. The left side of the EC2 Dashboard is as follows where key pairs can be managed and created using Network & Security | Key Pairs:


4. Click on Key Pairs reveals the following so to create the key pair click on Create Key Pair::


5. The Create Key Pair dialog is as follows and enter the name of the key pair to create with for this project is Passepartout paying homage to world traveler Jean Passepartout:


6. Click on the Create button to create the key pair. This will prompt the user to provided a save location:


The standard disclaimer applies: Do not lose the key pair they can only be downloaded once. 


Saturday, December 28, 2019

AWS/DevOps: Getting the Security Group of EC2 Instance using the AWS Console

Getting the security group assigned to an AWS EC2 instance using AWS's Console is trivial. Why discuss such a task? I have a problem. I inherited an EC2 instance and the existing key is with a guy on vacation and offline  I am concerned that DevOps infrastructure exists the uses the key to access the original EC2 instance so swapping keys is not an option. The solution is to clone the EC2 instance and assign the clone a known key pair using the same security group of the existing EC2 instance, hence the need to know an EC2 instance's security group.

Getting the security group for an EC2 instance is performed as follows:

1. Login to the AWS Console:
https://console.aws.amazon.com/

2. From the console, select EC2 (make sure the region is set correctly which for my project is US East (N. Virginia) us-east-1. You could search for EC2 but AWS puts EC2 top left under All services | Compute:


3. From the EC2 Resources select Running Instances (upper left):


4.From the list of EC2 images, click the checkbox of the EC2 instance for which the security group needs to recorded:


5. The security group can be seen in the Description tab under the selected EC2 instance:


Tuesday, December 24, 2019

OS/X: setting the default version of Java used

When developing a project it is often convenient to have a specific version of Java associated with JAVA_HOME and to have this version assignment made each time a terminal window is run,.

Setting JAVA_HOME to allow Java development  is not always about the latest and greatest version of Java. One of my current projects is Java 1.8. To configure my Mac accordingly, the first step was to determine  which version or versions of Java were installed.

To do this run a terminal window and from the prompt type:
/usr/libexec/java_home -V

This displays the version of Java available on a Mac:


Version 12.0 was the native version of Java on the Mac and version 1.8, had been installed later. Using Vim, create a .bash_profile file if it does not exist. If this file exists, edit the .bash_profile file. When using Vim to edit, use sudo to insure that the created./edit .bash_profile file can be saved:
sudo vim .bash_profile

The following line needs to be included in .bash_profile in order for version 1.8 to be the default version supported on the machine:
export JAVA_HOME=`/usr/libexec/java_home -v 1.8`

An example of .bash_profile being edit in VIM is as follows:


Close and save VIM once the change is made to .bash_profile. For the case of creating .bash_profile make sure that this file can be run as an executable:
sudo chmod +x .bash_profile

The sudo command is used before chmod to insure that the appropriate rights available to permit chmod +x being applied to .bash_profile.'

Assign JAVA_HOME using the following from terminal window:
export JAVA_HOME=`/usr/libexec/java_home -v 1.8`

If .bash_profile is a single line containing "export JAVA_HOME" the commands (or command) in the .bash_profile file can be invoked using:
source .bash_profile

Close the current terminal window and open a new terminal window. In the new terminal window run:
java -version

When the terminal window was created, .bash_profile should have been invoked so it should be no surprise that "java -version" displays the following: