Overview
The post presents how to generate a Bicep template from an existing Azure resource. The impetuous behind this post was an Azure application I was developing. I used Bicep to create eighty percent of my Azure resources:
- Storage Account
- App Service Plan
- Service Bus
For Bicep development I used:
- Visual Studio Code
- Microsoft's PowerShell extension for Visual Studio Code
- Microsoft's Bicep extension for Visual Studio Code: see Appendix A at the end of this post for instructions on how to install Visual Studio Code's Bicep extension
The application required Logic Apps and to create/configure the Logic Appls correctly, I used the Azure Portal (portal.azure.com). To complete the Bicep used to create the project's Azure resources, the Logic Apps needed to be Bicep-ized.
The steps required to extract a Bicep template for an existing Azure resource (such as a Logic App) are as follows:
- Get the resource ID for the Azure resource for which to create a Bicep template
- Use Visual Studio Code's Bicep extension to Insert the resource which will create the Bicep template for a given resource ID
The next two sections of this post present how to acquire the id of an Azure resource and how to generate a Bicep template from an Azure resource ID.
Get an Azure Resource ID using Visual Studio Code
To display, a resource's ID using Visual Studio Code, the Azure Resources extension can be used. This extension is installed as part of the Azure Tools extension (a package of multiple Azure-related extensions). The previous post,
Azure/Visual Studio Code: Installing Azure Tools Extension and Overcoming Azure Login Issues, demonstrates how to install the Azure Tools extension for Visual Studio Code. The previous post also discusses how to overcome login issues pertaining to the Azure Resource extension.
To invoke the Azure Resources extension which will be used to determine the target Azure resource's ID, click on the A-ish-shaped icon at the bottom of Visual Studio Code's activity bar. This will launch the Azure Resource extension:
As shown above, typing SHIFT+ALT+A simultaneously will also launch the Azure Resource extension:
After successfully logging into Azure, the Azure Resources extension displays, by default, the resources by resource type:
Recall that a Bicep template will be generated for a project's Logic Apps and Logic Apps are not in the resource types listed above. To remedy this, hover with the mouse over the Resources node in the tree of entities displayed by the Azure Resource extension:
Click on the Group By button at the top of the Azure Resources extensions where the Group By button is the icon to the right of the + icon. Clicking on the Group By button displays a menu of Group By options:
From the group by drop-down, select Group by Resource Group shown below. Once the Azure resources are grouped by resource group it is easy to navigate to the project's Logic Apps or any resources associated with a resource group.
A truncated example of the per-resource group's resource is shown below where the image was truncated given the sensitive nature of resource names:
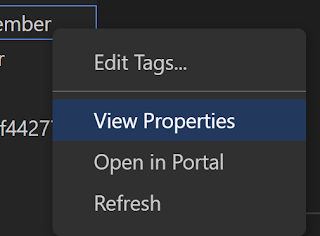
Right-click on the resource for which the Bicep template will be generated. This displays the following drop-down menu:

From the menu items, select View Properties which displays the properties as JSON file in a Visual Studio Code editor window:
Again, given the sensitive nature of Azure resource names and ID's, the properties of the resource are truncated. Obviously, the ID for the resource is easily identified.
There are other ways to get the ID for an Azure resource. These alternatives are addressed in the following sections of this post:
- Appendix B: Get an Azure Resource ID using Azure Portal
- Appendix C: Get an Azure Resource ID using the Azure Resources web app
- Appendix D: Get an Azure Resource using Azure CLI
Bicep Extension Generating a Template using an Azure Resource ID
Before using the Bicep extension for Visual Studio Code, create an empty Bicep file into which the Bicep extension will copy the Bicep template for a given Azure resource based on the Azure resource's ID.
For this project, an empty file named, logicapp.bicep, was created.
The commands associated with Visual Studio Code's Bicep extension are invoked using Visual Studio Code's Command Palette (see:
Command Palette). To display the Command Palette type the following keys simultaneously CTRL+SHIFT+P:
In the Command Palette's text box type: Bicep: Insert Resource until the command is recognized:
After selecting the Bicep: Insert Resource command in the Command Palette the following prompt is given based on the bicep files in the folder currently opened by Visual Studio Code:
From the list of files above, the file, logicapp.bicep, was selected. Once a file is selected, the following prompt is displayed:
Enter the resource ID previous looked up in the text box and press ENTER. This will generate the bicep template associated with the Azure resource ID. A truncated version of the Bicep file generated for the Log App is as follows:
Appendix A: Install Bicep Extension for Visual Studio Code
From Visual Studio Code's activity bar, select the extensions icon (the icon composed of four squares):
In the search box for extensions, enter the term, "bicep" which will display Microsoft's Bicep extension for Visual Studio code:
The landing page for the Bicep extension is as follows. Click on the install button to install the Bicep extension for Visual Studio Code:
Appendix B: Get an Azure Resource ID using Azure Portal
Appendix C: Get an Azure Resource ID using the Azure Resources web app
Appendix D: Get an Azure Resource using Azure CLI


No comments :
Post a Comment